Mail Merging 101: The Basics of Mail Merging in Word & Publisher
by Chelsea Camper | Last Updated December 30, 2015Mail merging is a common thing in many companies that print their own. Not everyone knows how to create a mail merge, so don’t feel silly if you’re one of the ones who has never learned how!
We’re going to talk a bit about the basics of mail merging in both programs so that you can feel more comfortable with printing your own, even if it involves a mailing list.
I’ll be using Word and Publisher 2007 to demonstrate mail merging, but the steps should be similar in most versions.
Starting a Mail Merge
Starting a mail merge is one of the easier parts of the process. Once you know where your mail merge options are located you can quickly start a mail merge in just about any document.
 Microsoft Word
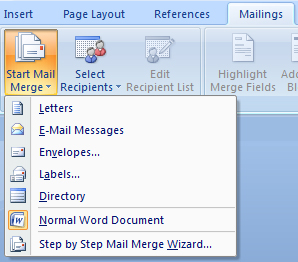
To start a mail merge in Microsoft Word, you’ll need to go to the Mailings tab at the top of your window. On the left hand side you should see a button that says “Start Mail Merge.” When you click it a list of different types of mail merges will appear.
Any time youd like to revert your document back to a standard Word document, you just click that button again and select “Normal Word Document”.
 Microsoft Publisher
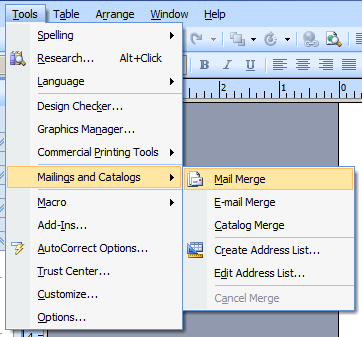
To start a mail merge in Microsoft Publisher, go to the Tools menu at the top of the screen. When you click it, a drop down will appear. About the middle of the drop down you’ll see “Mailings and Catalogs”. Clicking on “Mailings and Catalogs” will bring up a sub menu with a few mail merge related options. To start a regular mail merge just click “Mail Merge”.
Creating Your Spreadsheet
If you don’t already have a database of mailing information, this part might take the longest! You’ll need to have all of the information you want in your mail merge in a spreadsheet. You’ll want to set up a column for the first name, a column for the last name, a column for the street address, and a column for the city, state, and zip code. If you want to add extra information, you’ll need a column for each of those.
It’s easiest to do this in Microsoft Excel, so we’ll look into that before we look at the ways you can do it in Word and Publisher.
Microsoft Excel
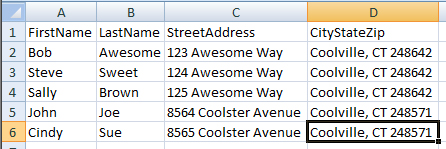 In Row 1 give each column a heading that lists what type of information is in each column (first name, last name, street, etc.). If you already have a database with mailing information, simply export that into Excel and edit the first row if need be to display header information.
You can start entering each person in your mailing list in the next rows. Again, this is easier if you already have a database. Once you have your whole mailing list in the Excel file, save it in an easy to reach location that won’t be moved for a while.
Microsoft Word
 If you don’t have Microsoft Excel or just plain refuse to use any spreadsheet program, you can create your mail merge list through Microsoft Word. You can either type out a new list or select people from Outlook.
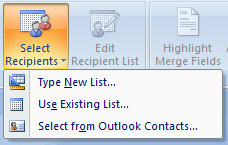
Still in the Mailings tab, click the button “Select Recipients” to the right of the “Start Mail Merge” button. A drop down will appear asking if you want to type a new list, use an existing list (an Excel or similar spreadsheet), or select people from your Outlook. Clicking “Type New List…” will bring up a window for you to type in your recipients line by line. Clicking “Select from Outlook Contacts…” will bring up a window where you can choose which Contacts folder you want to send to.
Microsoft Publisher
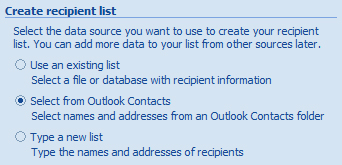 Once you have started the mail merge in Publisher, it’ll immediately ask you where it should get the recipients from. The options are the same three from Word: Use existing list, use contacts from Outlook, or type a new list.
Choosing the option to use contacts from Outlook will bring up a Contacts folder selection once you click “Next” near the bottom of the screen. Choosing the option to type a new list will bring up the same window from Word where you can input your entire mail merge list line by line.
Connecting Your Spreadsheet & Mail Merge Document
Assuming you already have a database or an Excel file with your mail merge recipients, all you have to do is connect your Word or Publisher document with your spreadsheet!
Microsoft Word
Selecting “Use Existing List” will bring up a file browsing window. Simply find your file and click “Open.” Select which sheet of your workbook youd like to use (usually it’s Sheet1) then uncheck any entries you don’t want to be mail merged.
After you click Okay, your Excel spreadsheet and Word document are then connected.
Microsoft Publisher
Selecting “Use an Existing List” will bring up a file browsing window. Once you have found your file, click “Open.” Select which sheet of your workbook youd like to use (usually it’s Sheet1) then uncheck any entries you don’t want to be mail merged.
Once you’ve clicked “Okay,” your Excel spreadsheet and Publisher document are then connected.
Adding Mail Merge Fields
Now it’s time to start integrating your mail merge into your document! A “field” is a cell in your Excel spreadsheet. You choose it by first selecting the column that you want (first name, last name, street, etc.). It will default to the second row of the document.
Microsoft Word
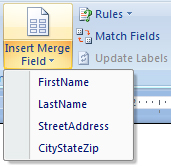 Place your cursor where youd like your first field then, still in the Mailings tab, click on “Insert Merge Field.” Clicking on the top half of the button will bring up a window for you to select which columns youd like to insert. Clicking on the bottom half of the button will give you a drop down menu of your headings to choose from.
At any time you can click the “Preview Results” button to see how the mail merge will look.
Microsoft Publisher
 Microsoft Publisher displays all of the fields you can merge on the left hand side. To insert a merged field you only have to double click on the field youd like to insert.
At any time you can preview what the mail merged document will look like by clicking away from the text box.
Having Multiple Entries on the Same Page
Sometimes you’ll have multiple mail merge entries on the same page (like when you’re printing four postcards on a sheet). When that happens, you may need to use the “Next Record” rule. What the Next Record rule does is force Word or Publisher to go to the next “record” which just means “Go to the next row in the Excel spreadsheet.”
Microsoft Word
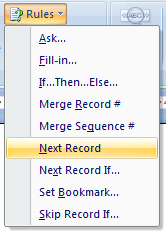 Still in the Mailing tab, you should see a button that simply says “Rules”. When you click it you’ll get a drop down of several different rules that you can use.
You can experiment with them as you see fit, but we’re going to focus on the Next Record rule. If you just click it in the drop down you’ll see a mail merge field entered into the document where your cursor was ( <Next Record> ). You can cut and paste it to get it in front of the mail merge field that you want to go to the next record.
Microsoft Publisher
When using Publisher there’s no need to use a Next Record field. Publisher is built for mail merging more than Word is. When you design in Publisher you’re designing one instance of your project. If multiple instances can fit on one page, publisher will copy your first instance as many times as possible that will fit on the sheet size you’ve selected to print on. Each instance should move to the next record automatically.
Use the Mail Merge Wizard!
Both programs have a Mail Merge Wizard installed to help walk you through creating your mail merge. Publisher’s wizard starts automatically. Sometimes you’ll need to manually start Word’s Mail Merge Wizard. In the Mailing tab when you click the button to start the mail merge, the last option at the bottom is “Step by Step Mail Merge Wizard…”. Clicking that will bring up a Mail Merge Wizard either on the left or right of the screen, depending on your settings.
The wizards will help make sure you do everything in the right order and will explain some of the options in more detail.
Don’t you feel as though you can take on a mail merge project by yourself now? Let us know in the comments below if you have any other mail merging questions and we’ll do our best to help you out!
Want some more Print Your Own tips? Check out our free Getting Started Guide!

Not endorsed by MICROSOFT. MICROSOFT WORD and MICROSOFT PUBLISHER are registered trademarks of MICROSOFT.