
QuickBooks W2 Alignment Fix…Take Two!
by John | Last Updated January 16, 2015This morning, we received an email from Intuit stating that a new QuickBooks payroll update has been released. This update addresses, among other things, the W2 and W3 printing alignment issue. The email text is below:
QuickBooks and W2’s…the saga continues!
by John | Last Updated January 14, 2015For those of you who have been following our blog over the past week, you have read about the problems QuickBooks users are having in regard to the printing alignment of preprinted W2 forms.
Read More…QuickBooks W2 Printing Issue Fixed
by John | Last Updated January 12, 2015The issue with W2 and W3 printing alignment in QuickBooks covered in last week’s article has been resolved.
W2 Printing Issue in QuickBooks
by John | Last Updated January 7, 2015When printing W2’s in QuickBooks, users have been noticing they can’t line them up to print out correctly on pre-printed forms. Intuit has confirmed that there is an issue and they are working toward a solution.
Is it legal to mail utility bills on just the postcard?
by Raki Wright | Last Updated September 8, 2010Q: Is it legal to mail utility bills on just the postcard? Or will it need to be put into an envelope?
A: We have many municipality and utility customers all over the country who use our utility postcards for their billing without enclosing them in an envelope. They are able to mail the bills for the less than the cost of a first class stamp alone!
Do you have a template or solution for Quick Books?
by Raki Wright | Last Updated August 30, 2010Are you looking to print postcards through Quick Books? If so, we have a how to page to help you step through that process, How to Save Money By Printing Your QuickBooks Invoices on Postcards.
Or, if you are looking to print the packing slip and shipping label on the same page, use our Peel Out!® Shipping Label Sheets (Item # LS-QB). It is designed for use with Quick Books (QB) . The way the label is positioned, if you print your regular packing slip out of QB directly onto the label sheet, then the shipping address will print on the label, and you can peel out the label and affix to your box.
How do I set up QuickBooks to print on postcards?
by Raki Wright | Last Updated February 18, 2010Here is a link to our help page on how to print QuickBooks postcards. Printing statements on postcards works the same way.
Free Shipping on W2 and 1099 Orders of $100 or more, Until January 15, 2009
by Raki Wright | Last Updated December 29, 2008
Burris Computer Forms’ IRS Tax Forms meet IRS regulations and work with accounting software that meets IRS specifications, such as QuickBooks and Peachtree Accounting. Forms W2, 1099-MISC, 1099-INT, and W2 software CD Roms are available. The IRS’ deadline for furnishing these forms to recipients is January 31, 2009. Burris has a Find Your W2 tool for users to find out a state’s W2 requirements. There is a $30 minimum order on W2’s & 1099’s.
Burris Blank Printable Billing Sets and Burris Blank Printable Fundraising Sets™
by Raki Wright | Last Updated August 26, 2008Burris Computer Forms announces Burris Blank Printable Billing Sets and Burris Blank Printable Fundraising Sets. Burris billing sets (blank invoice forms) and fundraising sets provide organizations with everything they need to bill their customers, or appeal for contributions. The blank forms are 8 ½ x 11 sheets, made from white 24# bond paper. They are pre-scored for easy folding and have a perforation so that a customer or member can return a stub showing how much money they are sending. Users can design and print the blank forms with any message using many different software programs. The #9 white envelopes allow customers and members to send their money without having to look for an envelope themselves. Both of the above items fit in #10 white envelopes to include everything a customer or member needs. The pre-scored and perforated paper, #9 envelopes, and #10 envelopes can be purchased as a set or separately.
The billing sets (blank invoice forms) and fundraising sets can be used as One Part Invoice with Customer Remittance, Solicitation letter with return stub, Statements, Tuition Statements, HR Payroll Forms, Medical Forms, Direct response Mailings, Payment Voucher, Tickets, Receipts, or Petty Cash Receipts.
How to save money by printing your QuickBooks invoices on postcards
by John | Last Updated June 4, 2008As postal rates go up, the task of invoicing your customers can get expensive quick. One way to save money is to print your invoices on postcards. You not only save money on postage (when using a 5.5″ x 4.25″ postcard), but you also save time and money by not having to fold and stuff your invoices into envelopes.
For QuickBooks users, it is a relatively simple matter to create an invoice template that can be printed on blank postcards.
** Note the screen shots and instructions that follow were created with QuickBooks Enterprise Manufacturing and Wholesale 2008 version, but there shouldn’t be many differences. You WILL need a printer that is capable of printing many sheets per page (e.g. each sheet of paper will have four pages on it)
Step 1
Open a new invoice, and click on the customize button in the upper right hand corner (see below).

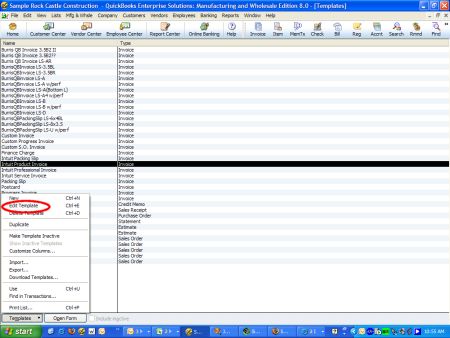
an alternate way to get to where we need to be is to go to the lists menu and click on templates. When the list of templates comes up, click on the one that you wish to work with (it will be highlighted black after you click it), then click on the templates button at the bottom left hand corner, and choose “edit template” (see below).
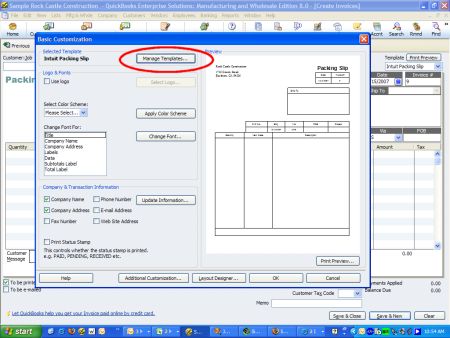
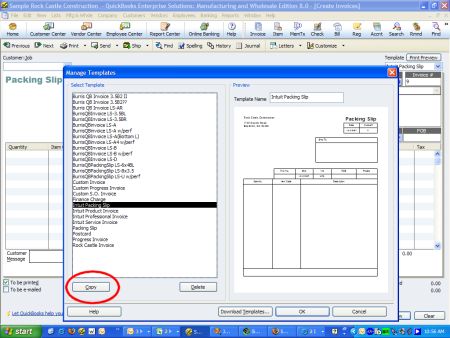
STEP 2
Click the “manage templates” button. When the manage templates screen appears, click on the template name you are working with and click the “copy” button in the lower left hand corner.
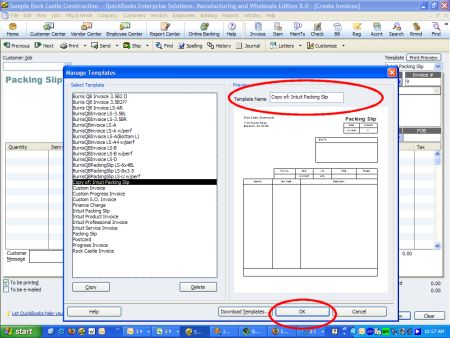
STEP 3
You will now be working with the copy you just made. Rename your template using the field in the upper right hand corner, and click OK.
STEP 4
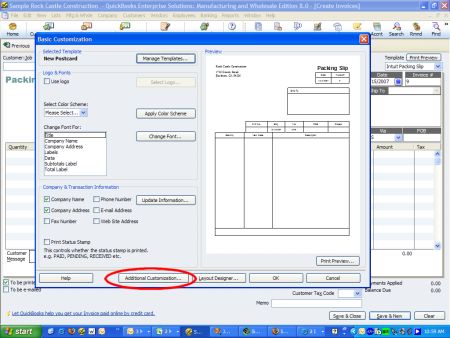
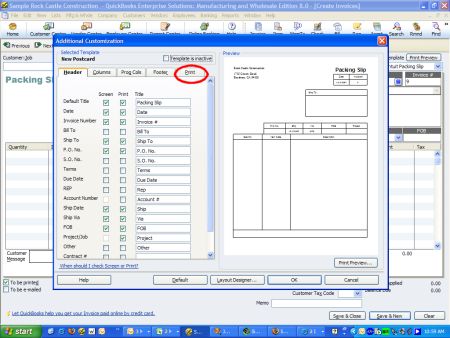
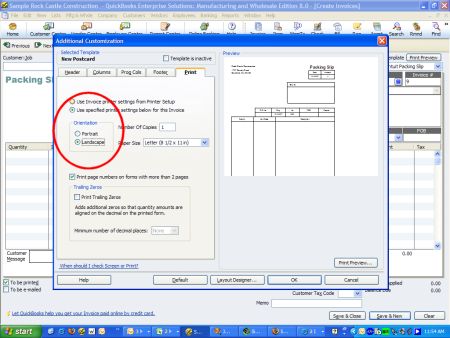
Click on the “additional customization” button. This will bring up the screen where you can add columns, etc. Once here, click on the “print” tab. You will make two changes here: choose the “Use specified printer settings below for this invoice”, then change the orientation to “landscape”. Keep the paper size 8.5″ x 11″. Once you’re done, click “layout designer”.
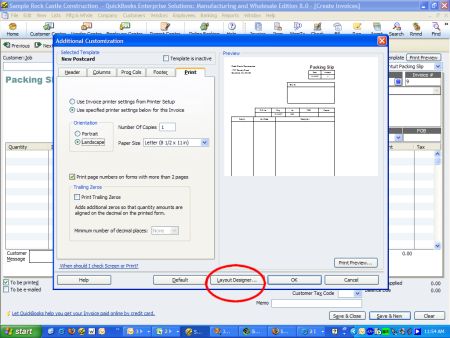
STEP 5
Here is where you’ll layout your postcard to your liking. Important: Make sure you layout your design to cover the entire 11″ x 8 1/2″ sheet. There are only 5 things that we can suggest here (see image below for corresponding letter):
A. Leave room in the upper right corner for the stamp.
B. Have a copy of the due date and total amount owed on the right hand side (in case your postcard has a tear off stub that your customer can mail back to you like these)
C. Shrink your main portion of the invoice to the left hand side of the postcard.
D. Place a copy of the bill to address in the lower right hand corner of the postcard. This is so the postal scanners will be able to properly scan your customer’s address and get it delivered there.
E. Leave a 5/8″ margin at the bottom of each postcard. Sometimes the Post Office places a sticker with a bar code at the bottom. If you leave that margin available, then you won’t lose any information.

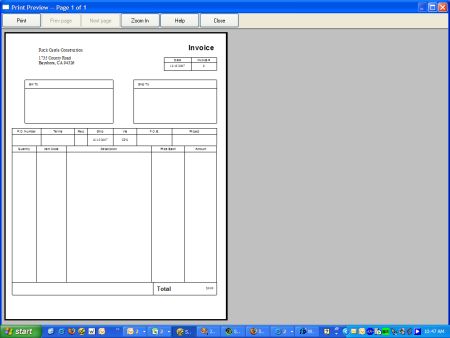
Once you’ve designed your template, you should have something that went from this:
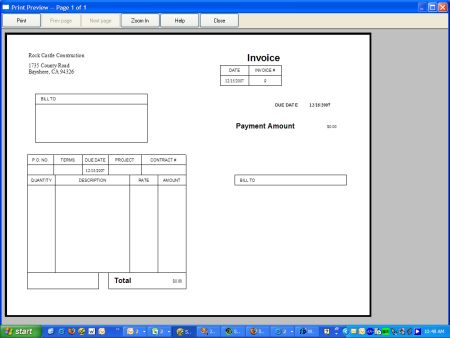
To this:
Printing your invoices using this method you won’t be printing your invoices out one at a time, you will instead be batch printing them. When putting your invoices in, make sure that the “to be printed” checkbox is checked on each invoice.

*** These next instructions will not have any screen shots with them as they are general instructions for printers and every printer will be different.
When it comes time to print your invoices, go into the properties of your printer and find the option that lets you determine how many pages fit on a sheet of paper. Change this option to “4”. Once that is done, print out your invoices!