
Easy Reordering
by Raki Wright | Last Updated July 8, 2008Burris Computer Forms now offers customers a simple way to reorder items purchased through our web site. For any customer who has created an account, just log in and click on your order history. Then click on the purchase that you wish to reorder, and click the reorder button. This will automatically put the items in your shopping cart. Then, all you have to do is put your credit card information and your order is done!
Way for Trade Associations and Non-Profit Organizations to Deliver a Message for Less Than the Cost of a First-Class Stamp Alone
by Raki Wright | Last Updated July 1, 2008Blank postcards are an effective, easy and inexpensive way to keep in touch with members, reach out for new members, announce special events and fund raisers, or thank donors for their support. By printing postcards in-house, organizations can quickly communicate time-sensitive needs, while saving time and cost. Blank postcards save labor, time, and money because there’s no folding, stuffing, or sealing. No special equipment is required. All that is necessary is a personal computer and inkjet or laser printer or copier. Postcards (4 1/4″ x 5 1/2″) can be mailed at $0.27 apiece, saving up to 35% on postage expenses. Printing postcards in-house eliminates buying, storing, and printing envelopes.
Burris’ website makes it easy for users to select the right paper (using its “What Weight Paper Will Your Printer Handle?” tool or Paper Weight Comparison Chart), order blank postcards (and have them delivered right to their door), create or change a message (using its free templates for Microsoft Word and Publisher), print quickly and efficiently (using its Four-of-a-Kind (TM) Postcards), and mail (by printing postage on postcards or using USPS bulk mail).
Glossy Trifold Brochures for laser printers, in Lightweight and Heavyweight
by Raki Wright | Last Updated June 11, 2008This new line of blank, printable trifold brochures can be printed in-house on users’ own PCs, using laser printers or copiers.
The Glossy Trifold Brochures are available on printable 8 ½ x 11 sheets scored twice, for easy folding.
The brochures are made from premium, white, glossy paper for high quality text, graphics, and pictures. The advantages of printing brochures in-house include fast turnaround, low cost, control of the project, and ability to print a few, or thousands, quickly and cost-effectively. Companies and individuals use Burris Trifold Brochures as an easy, convenient, cost-effective way to deliver a message.
How to save money by printing your QuickBooks invoices on postcards
by John | Last Updated June 4, 2008As postal rates go up, the task of invoicing your customers can get expensive quick. One way to save money is to print your invoices on postcards. You not only save money on postage (when using a 5.5″ x 4.25″ postcard), but you also save time and money by not having to fold and stuff your invoices into envelopes.
For QuickBooks users, it is a relatively simple matter to create an invoice template that can be printed on blank postcards.
** Note the screen shots and instructions that follow were created with QuickBooks Enterprise Manufacturing and Wholesale 2008 version, but there shouldn’t be many differences. You WILL need a printer that is capable of printing many sheets per page (e.g. each sheet of paper will have four pages on it)
Step 1
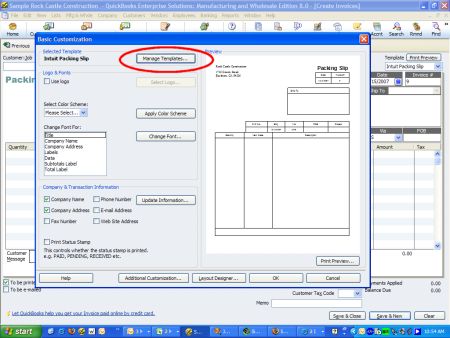
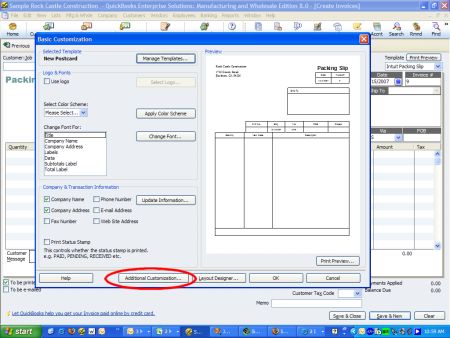
Open a new invoice, and click on the customize button in the upper right hand corner (see below).

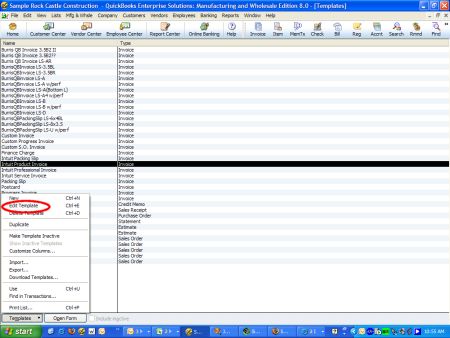
an alternate way to get to where we need to be is to go to the lists menu and click on templates. When the list of templates comes up, click on the one that you wish to work with (it will be highlighted black after you click it), then click on the templates button at the bottom left hand corner, and choose “edit template” (see below).
STEP 2
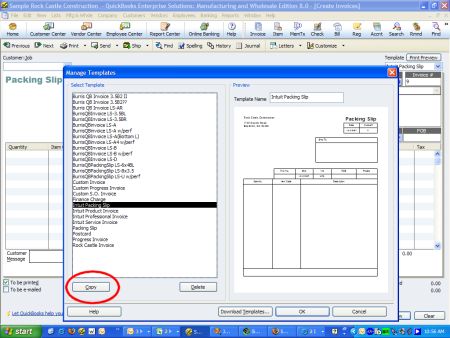
Click the “manage templates” button. When the manage templates screen appears, click on the template name you are working with and click the “copy” button in the lower left hand corner.
STEP 3
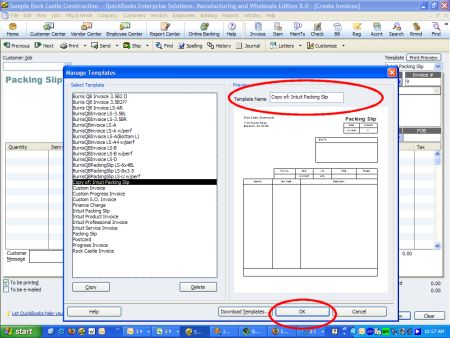
You will now be working with the copy you just made. Rename your template using the field in the upper right hand corner, and click OK.
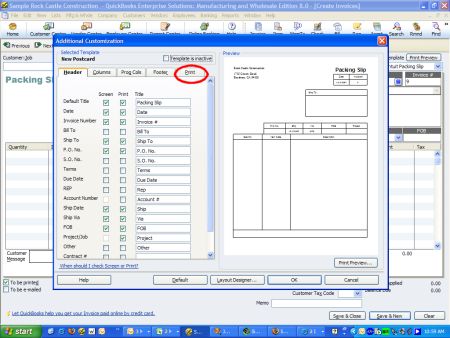
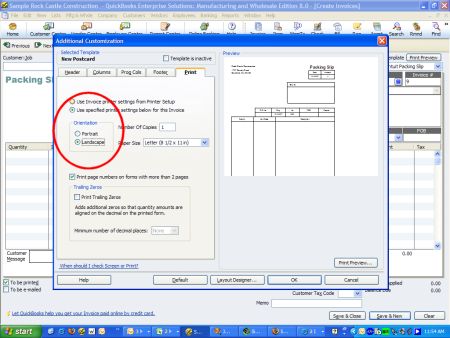
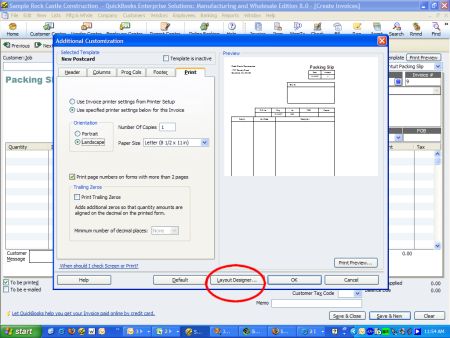
STEP 4
Click on the “additional customization” button. This will bring up the screen where you can add columns, etc. Once here, click on the “print” tab. You will make two changes here: choose the “Use specified printer settings below for this invoice”, then change the orientation to “landscape”. Keep the paper size 8.5″ x 11″. Once you’re done, click “layout designer”.
STEP 5
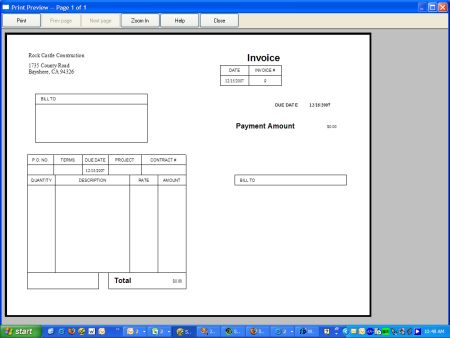
Here is where you’ll layout your postcard to your liking. Important: Make sure you layout your design to cover the entire 11″ x 8 1/2″ sheet. There are only 5 things that we can suggest here (see image below for corresponding letter):
A. Leave room in the upper right corner for the stamp.
B. Have a copy of the due date and total amount owed on the right hand side (in case your postcard has a tear off stub that your customer can mail back to you like these)
C. Shrink your main portion of the invoice to the left hand side of the postcard.
D. Place a copy of the bill to address in the lower right hand corner of the postcard. This is so the postal scanners will be able to properly scan your customer’s address and get it delivered there.
E. Leave a 5/8″ margin at the bottom of each postcard. Sometimes the Post Office places a sticker with a bar code at the bottom. If you leave that margin available, then you won’t lose any information.

Once you’ve designed your template, you should have something that went from this:
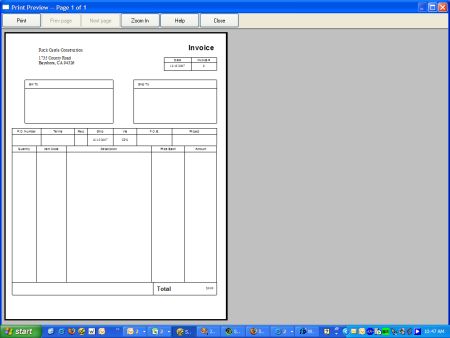
To this:
Printing your invoices using this method you won’t be printing your invoices out one at a time, you will instead be batch printing them. When putting your invoices in, make sure that the “to be printed” checkbox is checked on each invoice.

*** These next instructions will not have any screen shots with them as they are general instructions for printers and every printer will be different.
When it comes time to print your invoices, go into the properties of your printer and find the option that lets you determine how many pages fit on a sheet of paper. Change this option to “4”. Once that is done, print out your invoices!
Blank, Printable Recycled Postcards
by Raki Wright | Last Updated June 2, 2008In an effort to address the growing need for recycled products, Burris Computer Forms is pleased to announce an environmentally friendly addition to its Four-of-a-Kind Postcard™ line. This new product in the Burris line of blank, printable postcards is made from 30% recycled paper, which provides users the ability to print postcards in-house and still “go green.”
The postcards made from 30% recycled paper content are available on blank, white 8 ½ x 11 sheets perforated twice, for easy separating. This new product in its line of blank, printable postcards can be printed in-house on users’ own PCs, using laser or inkjet printers, or copiers.
The advantages of printing postcards in-house include fast turnaround, low cost, control of the project, and ability to print a few, or thousands, quickly and cost-effectively. Companies, churches, other non-profits, and individuals use Four-of-a-Kind Postcards™ as an easy, convenient, cost-effective way to deliver a message.
Website Paper Weight Equivalency Chart
by Raki Wright | Last Updated May 23, 2008Burris Computer Forms announces a new tool on its website which can be used to cross reference paper weights in gsm, bond, text/book, cover, bristol, index, and tag.
The paper weight equivalency chart references the terminology a user may be more familiar with in their industry. Oftentimes paper manufacturers specify their papers’ weights in different measurements. With Burris’ new paper weight equivalency tool, users can easily find what papers their printer will handle, regardless of the way the weight is expressed.
The chart compares different paper weights to gsm or g/m2, grams per square meter — the metric measure of the density of paper, a measure often quote by printer manufacturers. Other paper measurements depend on the basis size from which to calculate its variable weight, which requires background knowledge of what size paper is used in each scenario.
A widget (a downloadable interactive tool) is available for use on any website or desktop.
What Paper Will My Printer Handle? Website Tool
by Raki Wright | Last Updated May 16, 2008
A new chart is also available to help users compare paper weights. A widget (a downloadable interactive tool) is available for use on any website or desktop.
How We Saved At Least 15% on Postage: Part 5
by Raki Wright | Last Updated August 24, 2007Read How We Saved At Least 15% on Postage: Part 1
Read How We Saved At Least 15% on Postage: Part 2
Read How We Saved At Least 15% on Postage: Part 3
Read How We Saved At Least 15% on Postage: Part 4
Mail Entry Overview:
Discount mail must be taken to your Business Mail Entry Unit (BMEU). You must keep all documents and receipts for 1 year from each mailing date. Locate your BMEU at http://pe.usps.com/
This is the same office where you apply for your mailing permit, obtain and submit postage statements, and pay for your postage. The staff are a great resource for all your business mail questions. They will generally be able to answer questions about sorting, barcoding, rates, dimensions, mail piece design, and more because they verify that your mail meets these guidelines.
When you enter the office, tell the staff you have a mailing to send. They will take a sample (about 10-20 pieces) of your mailing to weigh, which will determine the weight of an individual mailing piece. Then, your postage statement and CASS Summary Report will be reviewed to compare how many pieces you stated were in the mailing. This will be compared to the weight they obtain for your full mailing. The barcoding scanner will also be used to ensure your barcodes can be read by the machinery. Your paperwork will be completed, postage paid for, and receipt issued.
I hope your BMEU is as nice and helpful as ours.
Mortgage marketing using postcards #2
by Raki Wright | Last Updated August 23, 2007Here are a plethora of great examples of mortgage postcards to use for your retail marketing!
How We Saved At Least 15% on Postage: Part 4
by Raki Wright | Last Updated August 17, 2007Read How We Saved At Least 15% on Postage: Part 1
Read How We Saved At Least 15% on Postage: Part 2
Read How We Saved At Least 15% on Postage: Part 3
Preparation Overview:
Use quality addresses.
Using a reputable database service whose goal is to help you reach your mailing objectives is key. When selecting one, be sure to ask these questions:
Is this a purchase or rental? What time period?
How often is your data updated?
Is there a guarantee on quality and address deliverability?
How often is the data cleaned and matched with the USPS National Change of Address (NCOA), ZIP+4 and Delivery Sequence File to standardize and keep the addresses accurate?
What format is the data in?
If purchasing labels, are the addresses properly formatted in ZIP+4 format with a barcode to ensure USPS scan ability?
If purchasing labels, are they in zip code order (useful in discount mailings)?
What data is included in the listing?
What is the record count and cost (based on your search criteria)?
Is there a market research report and/or preview available before purchasing?
Did the sales representative compare the SIC codes and/or descriptive codes to ensure accurate comparison?
Are there any additional fees beyond the per record fee?
Verify addresses with USPS using PC postage technology.
The mail pieces will be delivered faster if the addresses are complete and have been verified through the Post Office’s Zip Code verification system. A CASS Certification Report will be required by the post office to standardize and correct the addresses to include the ZIP+4 codes. This will minimize time-intensive, manual corrections to your database. Also, you will avoid the exorbitant postage cost of re-mailing these pieces. Printing the barcode above the mailing address is also helpful so the post office’s machines have room for any necessary markings.
Always test print on plain paper.
Avoid wasted card stock and postage before printing your entire mailing. If there are any changes to make, you will be able to do so prior to your full print.